Showing posts with label kitchen. Show all posts

Tuesday, December 2, 2014

December Daily 2014 {Day 1}

Good morning! How was your Thanksgiving?

Our Thanksgiving weekend was fun, but the two weeks before...craziness!

Can you do me a favor? The next time I decide to move cross country and host a major holiday two weeks later, please remind me how crazy it was to unpack and shop and cook and get the house ready at the same time!

But really, without the deadline of hosting guests for a holiday, I seriously doubt we would have gotten everything unpacked and organized so quickly. So maybe I should always plan a big party right after a move so we have to get everything done?

Of course, the house is in upheaval again as we pull out all of the Christmas decor and try to figure out where it all fits in our new apartment!

And its time to begin another one of my favorite holiday traditions - December Daily. Like previous years, this will be my only digital project of the year.

I'm using Shutterfly again, because it is just so easy! Every morning I upload the pictures from the day before {or I upload my iphone pictures directly from their app - so easy!} I add the pages to the book one at a time, and by the end of the month, my book is done and ready to order!

I'll be sharing a bit about our days + my layouts here. It might be daily, it might not...I guess I'll just have to see how it works out! But I will be linking up with Ali Edwards.

And so, its on to Day 1!
It was a pretty normal December day. A little baking, watching food network by the tree.

We started our advent calendars. They are a wonderful tradition in my family. Every year, my aunt buys us all a chocolate advent calendar. It is one of my favorite December things, and I can't imagine starting off a Christmas season morning without that little piece of chocolate!

A little out of the ordinary today, AJ came home for lunch. He called around 1:15, he'd forgotten his lunch and since we live just 10 minutes away, he decided to come eat here. It was so fun to see him for a bit in the middle of the day!

Of all those stories today, I decided to start off December Daily with the peanut butter oatmeal cookies I was making. Which is nothing new really. 2011 and 2012 started off similarly, talking about cookies and baking...and 2013 started with another favorite holiday treat!
"It seems December Daily always starts with something baked. The start of this month, bringing out the Christmas decorations, watching our favorite Christmas movies {Home Alone | Christmas Vacation}, the cold weather, it all makes me want to fill the kitchen with flour and sugar and vanilla.
I tried a new recipe this time - peanut butter oatmeal cookies. I'm calling them "breakfast cookies", but just so I don't feel bad eating them in the morning!"

It feels awesome to start this project. How are you documenting your Christmas season?

Find more from Katie Stories here:
twitter | facebook | instagram | pinterest | google+ | bloglovin

Tuesday, July 15, 2014

Mac and Cheese {Scrapbook Layout}

Happy Tuesday!

Sorry I kind of disappeared last week - things just got very crazy around here, and many things {including blogging} had to take a back seat!

But I will have that summer update post ready for tomorrow now! I'm really excited about it too - because I've actually done a whole ton of things on my summer list!

But before that, I have a scrapbook layout that I wanted to share!

A few weeks ago, I decided to switch from D ring albums back to post bound. But when I did, I ended up with a few blank pages in my albums. Since I scrap chronologically, I decided to make a layout that could really fit in anywhere to fill up the blank spot in my 2013 album.

And that's where a layout about a recipe came in.


But not just any recipe, my all time favorite comfort food - mac and cheese. It is seriously the easy recipe ever...and it was a really easy layout too. I just added a few pictures of different stages in the cooking process, and the journal is just the recipe itself!

Macaroni and Cheese
Adapted From: Bon Appetit's Fast Easy Fresh

Ingredients
8 oz pasta
2 1/2 Tablespoons butter + 1/2 Tablespoon butter
3 Tablespoons flour
3/4 cup milk
3/4 cup water
1 bullion cube
8 oz fat free sharp cheddar cheese, shredded
1/4-1/3 cup panko breadcrumbs
1 Tablespoon Parmesan cheese

Directions
  • Cook pasta according to the directions on the box.
  • While the pasta is cooking, melt 2 1/2 Tbsp butter in a large skillet. After the butter is melted, whisk in the flour. Whisk until the flour has cooked and is a light brown color (about 2 minutes)
  • Add the milk, water and bullion cube. Continue whisking until the flour is incorporated into the liquid. Raise the heat slightly to allow the mixture to simmer and thicken up. Stirring as needed.
  • Add the cheese, stirring until it is totally melted. Remove from heat. 
  • Pre heat the broiler.
  • Melt the remaining 1/2 Tablespoon butter (I usually do this in the microwave) and stir in the breadcrumbs and Parmesan cheese.
  • When the pasta is done, add the pasta to the cheese sauce and stir to combine. Place the coated pasta in a casserole dish and top with the breadcrumb mixture. Broil for 2-5 minutes, until the breadcrumbs are toasted.


Oh man...now I'm really hungry...and its way way too early in the morning to be eating macaroni and cheese. Right? That's probably not a great breakfast idea? Or maybe it is...

Well, excuse me while I go convince myself that pasta and cheese is the breakfast of champions ;)

Do you scrap chronologically? Do you ever need "filler" layouts? What do you use?


Find more from Katie Stories here:
twitter | facebook | instagram | pinterest | google+ | bloglovin

Wednesday, July 2, 2014

4th of July {Decor + Recipe}

Can you believe that it is already July?!

One of my favorite things about July (aside from it being summer break!) is 4th of July. We usually barbecue, go to the beach or the pool or run around in the sprinkler, decorate the house and turn all the food I can red + white + blue.

Last year, we started with these flag toasts for breakfast. This year, we are starting with something a little bit sweeter...or maybe ending with it, because it is definitely dessert! But on holidays, you can have dessert for breakfast, right? ;)

Some of my favorite summer treats involve fruit, pound cake and cool whip. But I wanted to make it a little more special with cookie cutters + food coloring. Because I will use any excuse to use cookie cutters + food coloring!


For this year, I decided to try out two different breakfasts desserts. My original idea was to make kabobs with the stars and strawberries, and cover them in Cool Whip. But then I thought star sandwiches would be so much more fun (and easier to eat!)


In the end, I'm glad I tried it both ways, because I loved the little sandwiches best, but AJ liked the kabobs better! So on Friday, I'll just make both. They were definitely easy enough for that!

And the food isn't the only thing I decorate...just after we got home from vacation in June, I decked the house out in patriotic colors. And the best part was that everything came from my stash or from our "waiting to be recycled" pile.


the stars and stripes papers were all in a summer pack that I've had for years, the polka dot papers were from a paper pack I bought last year | the stars were cut from an old moving box and painted or covered in paper | the firecrackers are empty breadcrumb containers | the flag "canvas" is an old cheerios box that's been painted + covered with scrapbook paper

Oh man, I really can't wait to celebrate on Friday - we are just hanging out at home, cooking, eating and playing in the sprinkler! What are your plans?


Find more from Katie Stories here:
twitter | facebook | instagram | pinterest | google+ | bloglovin

Wednesday, May 28, 2014

Honey Stick Favors {Wedding Recaps}

One of the most difficult things for the wedding were the favors.

We knew right off the bat that AJ and I both really wanted to give edible favors. But we had so much trouble picking what exactly that would be.

We went through everything from caramel apples to black and white cookies to jars of honey. But there were problems with each:

Caramel Apples: They come in bulk. As in, not in individual bags. So we'd have to be putting sticky apples into plastic bags the night before the wedding. Drama I did not need.

Black and White Cookies: My favorite cookies of all time. But AJ's not such a fan. And they totally didn't go with our wedding colors. Besides, I'd probably eat all of the cookies before the wedding. Then I wouldn't fit into my dress and we'd have to buy more favors!

Jars of Honey: There were two problems with this favor. One was that the company didn't want to ship until September, and like the caramel apples, I didn't want to assemble favors the week before the wedding. And we had a lot of people traveling, and I was concerned that they wouldn't be able to bring them back in their suitcases with the TSA liquid restrictions. But we still loved the idea of honey!

So we finally settled on a favor, and I couldn't have been happier with it!


Honey straws. Basically, little one serving straws full of honey. Easy to transport, in our wedding colors and we could assemble them way before the wedding day!


 We decided to go with four different flavors of honey {CLOVER CINNAMON WILDFLOWER CARAMEL} and bundle them in groups of five.

This came together so super easy. It took four people less than an hour to bundle these all together!


We printed up two sets of labels: one with our names and wedding date, the other with the type of honey and punched them out.


Then, we just wrapped the bundles with raffia, slipped the labels on and voila! Favors!

Photo Credit: Ruby Star Photography
In the end, we were so happy with our edible honey straw favors! What types of favors are your favorite?


Find more from Katie Stories here:
twitter | facebook | instagram | pinterest | google+ | bloglovin

Friday, May 23, 2014

Project Life 2014 {Week 18}

Happy Friday!

Are you looking forward to the three day weekend? I am! We have lots of fun plans - a crawfish boil, a concert, some crafting and, of course, relaxing!

I'll be working on this wreath and of course Project Life! I'm all the way done through Week 18...now I just need to order the rest of the pictures so I can get moving on the next weeks!

Week 18 | April 28 -May 4, 2014
This was the first week back at school after Spring Break. We had Super Hero day at school - and I wore my neon pink tights (I didn't retouch that picture at all - they are THAT pink!) And the Mets played the Phillies, so we were able to wear our awesome 10.5 Phillies/Mets shirts (thanks T&J!) We also did some fun things around the house - like tapas date night, made a chalkboard burlap runner, sealed all the windows (okay, that wasn't so fun!) and relaxed with some Corona (that was fun!) 

And I made a whole bunch of waffles to freeze for breakfasts later in the month (one is heating up as I type!) I love making waffles and bread and granola bars for us. It just makes me feel like I am doing something really really good for our little family. You see, I used to be the pickiest eater. And I'm so excited whenever I try something new (like homemade waffles vs. Eggo!) 

But, I'm still a little bit picky. Like, I don't eat ground meat or seafood. I just don't like the texture. Usually, its not an issue, but I'm a little nervous about it this weekend. Remember how I said we were going to a crawfish boil. Well, I don't eat seafood.

So, usually I just quietly eat other things - like the potatoes and corn and desserts! - but sometimes people notice and some people make a huge deal that I don't eat seafood. And it kind of drives me crazy. And I never know what to say, because I don't want to be rude, so I just sit there and don't say anything at all. Or I apologize that my tastes aren't to their liking. But there has to be a better response!

Which leads me to a question for all of you...what do you do when someone comments on your eating habits?


Find more from Katie Stories here:
twitter | facebook | instagram | pinterest | google+ | bloglovin

Thursday, May 1, 2014

Chalkboard Banner Burlap Table Runner {Tutorial} Plus a BurlapFabric.com {Giveaway}

Happy Weekend Eve and Happy May!

I love May: the school year is winding down, my birthday is this month and its fun to start sprucing up the house now that spring is here. And you know, since the wedding, when I do some sprucing up, burlap is almost always involved!

As if they knew I was looking for something to decorate my new house, the lovely people at BurlapFabric.com reached out and asked if I'd be interested in creating a tutorial with some of their products + hosting a giveaway for my readers!

You bet I jumped all over that!

The hardest thing was deciding what I wanted to create a tutorial with. We just got our new table delivered, so I knew I wanted something to decorate our table. It was just a question of what?

There were so many table linens to chose from! I was pretty torn between place mats and a table runner. And then I got distracted by this tree skirt and almost went all Christmas on everyone!

Fortunately, AJ was home and I let him decide. And that's how I ended up with a burlap table runner :)


{Materials}
14x90 table runner
Cardstock or heavy paper (I had these index card dividers on hand)
Chalkboard paint - spray paint or paint on would work
Glue (I planned on using tacky glue, but ended up using a glue gun because it dries faster!)
Embroidery floss
Large needle


{Directions}

Step 1 | Decide how many banner shapes you want or can fit on your runner. This one fit 9.

Step 2 | Create your banner shapes. I started with a 4x6 rectangle (after I cut off that little index tab). Then, I cut a 2" triangle out of the bottom to make my pennant shape.

Step 3 | Paint the banners with the chalkboard paint. I used a little trick here and adhered them to the box with repositionable tape so they stayed still while I painted. It worked really well inside...but it was not strong enough to hold them down with the very windy conditions outside. And that's why I was painting in the guest bathroom.
I gave each banner three coat of paint so they were extra chalkboardy. Then I let them sit for 3 days, as per the directions.

Step 4 | Using the side of your chalk, cover each banner totally in chalk to prime the surface. Then wipe it clean.

Step 5 | Glue them down to your burlap runner. I ended up going with a glue gun, instead of tacky glue here. Either way, make sure you put something under the runner. It was a lot easier to separate the glue from this paper than it would have been from the floor!

Step 6 | This step is entirely optional. I used embroidery floss to stitch a banner ribbon at the top of each pennant. I just liked how it looked, but it is definitely not necessary!

Step 7 | Write a message and enjoy!

Step 8 | Enter the giveaway below for a chance to win a coupon code good for $30 off any purchase at BurlapFabric.com There are so many wonderful things to purchase - from lace ribbon and rolls of fabric to home decor items and bags. What would you buy with the $30?

a Rafflecopter giveaway

Find more from Katie Stories here:
twitter | facebook | instagram | pinterest | google+ | bloglovin

Friday, March 21, 2014

Project Life 2014 {Week 8}

Happy Friday!

This is another one of those weeks that I am happy is over! I thought last week was the longest week of the school year - until this week! I think everyone is starting to get spring fever!

Fortunately, my scrapbook room is almost entirely done, and my Project Life station is complete so I was able to start making some new layouts. I shared Week 7 yesterday at Julie's, and I'm sharing Week 8 today here!

Week 8 | February 17 - February 23

This was our first full week in the house! We did a lot of unpacking, and building furniture and setting up the house just how we wanted it. And I even made dinner in the new house for the first time - and made AJ take a few pictures, of course!

We also had a huge surprise this week! My mom was coming to visit us, and as a surprise, my Nonni came with her! We had no idea that she was coming for a visit, but it was so fun to have them both in Baton Rouge :)


And I just had a add a close up of this picture. I just love this shot of AJ building the tv stand. He was handling it well on his own, so I was looking for something else to do. Taking pictures of him while he built it just seemed fun - and it was!

I am so glad that (for the most part) the boxes are gone and we are all set up in the house. There are still a few with odds and ends that I haven't placed yet, but that's not too bad. After all, we've only been in the house for 5 weeks, and we've been working all that time too!

How long did it take you to unpack when you moved?


Find more from Katie Stories here:
twitter | facebook | instagram | pinterest | google+ | bloglovin

Wednesday, December 18, 2013

December Daily 2013 {Day 13 + Day 14 + Day 15}

Wednesday is finally here!

It seems like its been a long week, and I'm not sure why. I was just thinking that when I was a kid, December moved so slooooowly, and as a grown up, it goes by too fast. That's when December decided to slam on the brakes. I'm grateful, because it gives me more time to enjoy every moment of this awesome season.

And this weekend was the perfect time for time to slow down a bit. We held our {now annual} Cookie Exchange Party! I so love this party, and was so glad we held it again!

Since we were hosting our cookie party on Saturday, we spent all of Friday cleaning up around the house. Well, AJ did most of the cleaning Friday while I was at work (although I did help out by making sure all of the clutter and things were put away so he could do the more heavy duty things, like scrubbing floors and such!)

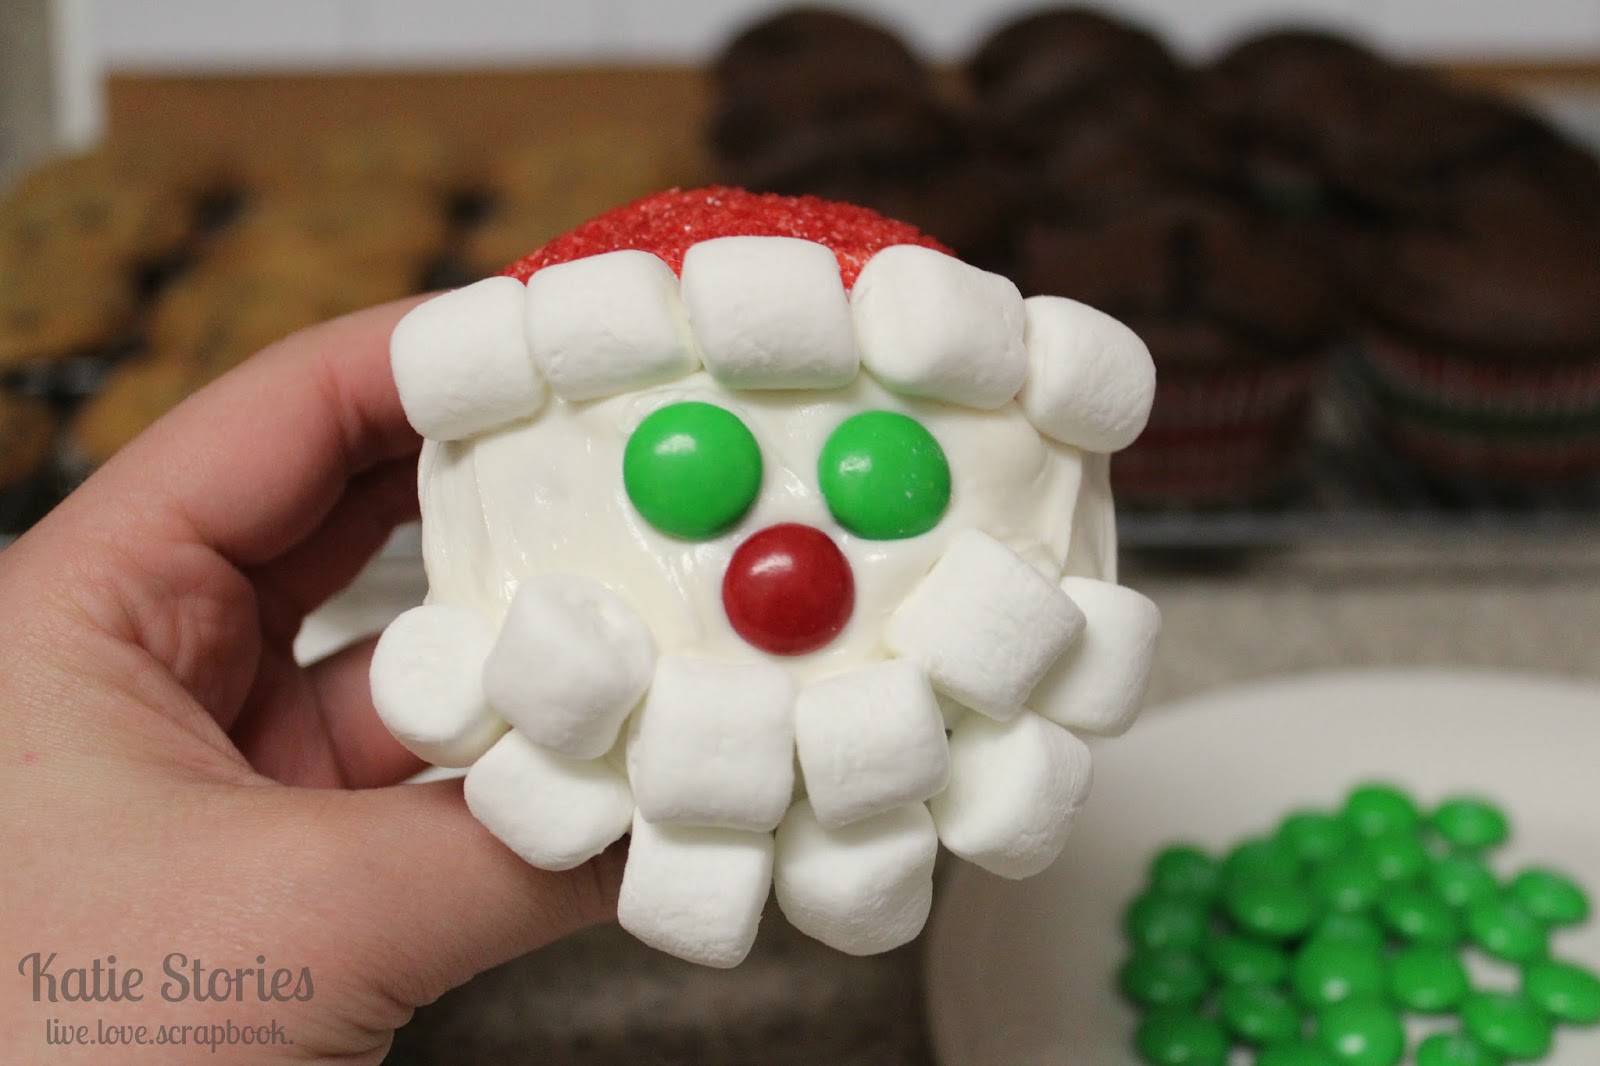
Saturday was party day! I decided to make my extra special Santa Cupcakes this year. Normally these are treat that my family saves for Christmas Eve, but I thought it would be fun to add them to our cookie table!

Can you believe how many cookies and treats we had left over? And that is after everyone packed up cookies to bring home! Our tummies + freezer are full of cookies now. And I even brought two big containers into work!
The day after a party is always a day to relax in our house. I was still pretty wide awake after everyone left, so AJ and I cleaned up from the party (leaving out only those cookies in the picture above!) so when we woke up Sunday, we had absolutely nothing to do! Well, AJ had to work, and I had to do some paperwork + run an errand. But aside from that, we had nothing to do! I spent the afternoon scrapping and drinking tea from my Spode mugs.

Do you feel like time has slowed down yet this month? Or is it still flying by for you? I really really hope it stays slowed down - especially when we are spending time with our family!


Find more from Katie Stories here:
twitter | facebook | instagram | pinterest | google+ | bloglovin

Tuesday, December 17, 2013

Santa Cupcakes

Way back when I was in elementary school, my mom found a recipe for Santa cupcakes somewhere.


I'm not entirely sure where. (This was before the internet and Pinterest, when people cut things out of magazines and pasted them into books.) My mom just told me that she got the recipe from a friend, Margaret. Thanks Margaret!


But it quickly became a family favorite, and a very special Christmas Eve treat.


The best part of these cupcakes is that they are super super simple!

Ingredients:
Cupcakes (we always make our from a box, but you can use your favorite homemade recipe if you want!)
Vanilla frosting
Red sugar crystals
Mini marshmallows
M&Ms


Frost your cupcake with the vanilla frosting.

Dip the top 1/3 of the cupcake in the red sugar crystals.

Add marshmallow trim to Santa's hat.

Add M&M eyes + a red nose.

Make a beard out of mini marshmallows.

Enjoy!

Oh man, I am so excited for Christmas now! Not that I wasn't before, but now...so so excited!


Find more from Katie Stories here:
twitter | facebook | instagram | pinterest | google+ | bloglovin

Wednesday, November 13, 2013

Macaroni and Cheese

One my absolute favorite things in the world is macaroni and cheese.

When I was little, it was one of the only things that I would eat. Seriously, I think if my mom would have let me, I would have lived off of Kraft mac and cheese, pizza and chicken nuggets.

I still love Kraft in the blue box (seriously, there are about nine boxes in my pantry right now, you know, for emergencies). But I also love this mac and cheese recipe. It is a favorite in our house, and makes appearances at quite a few holidays as well.

My mom originally found it in Bon Appetit's Fast Easy Fresh cookbook, and over the years, we've adapted it to make it work for our family (and the things I usually have in my pantry!)


Ingredients
8 oz pasta
2 1/2 Tablespoons butter + 1/2 Tablespoon butter
3 Tablespoons flour
3/4 cup milk
3/4 cup water
1 bullion cube
8 oz fat free sharp cheddar cheese, shredded
1/4-1/3 cup panko breadcrumbs
1 Tablespoon Parmesan cheese


Directions

Cook pasta according to the directions on the box. Fun shaped pasta is optional, but I always like it!


While the pasta is cooking, melt 2 1/2 Tbsp butter in a large skillet. After the butter is melted, whisk in the flour. Whisk until the flour has cooked and is a light brown color (about 2 minutes)

Add the milk, water and bullion cube. Continue whisking until the flour is incorporated into the liquid. Raise the heat slightly to allow the mixture to simmer and thicken up. Stirring as needed.


Add the cheese, stirring until it is totally melted. Remove from heat.


Pre heat the broiler.

Melt the remaining 1/2 Tablespoon butter (I usually do this in the microwave) and stir in the breadcrumbs and Parmesan cheese.

When the pasta is done, add the pasta to the cheese sauce and stir to combine. Place the coated pasta in a casserole dish and top with the breadcrumb mixture.


Broil for 2-5 minutes, until the breadcrumbs are toasted.


*This recipe doubles really easily, and I often make it ahead of time (stopping before broiling) then just heat it up/broil it in the oven when I need it!
*You can replace the water + bullion cube with chicken or vegetable stock if you have that in your pantry. I just never do!
*Add ins are great here! Mushrooms. Bacon. Different types of cheese. More bacon. If you try some new ones, let me know!

For a printer friendly recipe, click here

Well, I know what I am having for dinner tonight now!

What about you?


Find more from Katie Stories here:
twitter | facebook | instagram | pinterest | google+ | bloglovin

Tuesday, October 29, 2013

Project Life 2013 {07.22 - 07.28 + 07.29 - 08.04 + 08.05 - 08.11}

Hi everyone!

Did you have a great weekend? We did.

During the weekend, I thought we got absolutely nothing done, but while I was reading Becky's post, I realized we actually did a lot more than I thought.

Unfortunately, despite my plans, crafting wasn't one of those things.

But that didn't stop me from breaking out my Project Life things last night (and this morning!) and finally crafting again for the first time since the wedding!

It was so fun to break out my crafty things again. This is going to be a very long day away waiting for work to end so I can get back to crafting!

07.22-07.28 Home + Out East + Bachelorette Party
Left side pictures: Enjoying lunch at the pool ~ Wearing my "BRIDE" t-shirt while doing wedding crafting ~ Benny wearing a sock after cutting his foot (he was okay, it was a tiny cut, it just was bleeding as he walked on it on the floor)
Right side pictures: Farmer's Market ~ Painting my nails at the bachelorette party ~ Enjoying some wine in the pool ~ Bridal party bachelorette t-shirts ~ Beach ~ The girls at a winery

07.29-08.04
Left side pictures: Traveling ~ Not buying cherry tomatoes at Target because they were out! ~ A bachelorette party inspired spa basket
Right side pictures: More traveling ~ And even more traveling! ~ AJ at the driving range

08.05-08.11
Left side pictures: Baked Potato Soup ~ Oatmeal Applesauce Muffins ~ At the bowling alley
Right side pictures: Setting up my classroom ~ The apartment all cleaned up ~ More classroom set up ~ Bowling again! ~ My extremely messy desk

I am still playing some serious catch up with Project Life! But I am hoping to finish up the rest of August this week, and maybe even September too :)

Well, I better go jump in the shower before work! See you all tomorrow!


Find more from Katie Stories here:
twitter | facebook | instagram | pinterest | google+ | bloglovin

Wednesday, September 25, 2013

Apple Cheddar Muffins {3 Points+}

I have to tell you about these Apple Cheddar Muffins! They are amazing! Seriously, I cannot get enough of them...and the best part is that they are only 3 points on Weight Watchers so I can eat them whenever!

And seriously, with all the pre-wedding stress, I definitely have been snacking!

I've heard there are brides who get so nervous before the wedding that they don't eat at all and lost weight before the wedding! I'm only 4 pounds from my goal weight...why can't I be one of those brides?!

But, I'm not. I get stressed and I want to snack.

And that's where these muffins come in!

I found the original recipe here. It is actually a quick bread, but I wanted to change it up, because I just really love muffins. And they are harder to over indulge on. I can eat one muffin and stop. If this was a loaf of bread, I'd have eaten the whole thing in one sitting!


Apple Cheddar Muffins
Slightly adapted from Simply Stacie

Ingredients:
2 cups whole wheat flour
1 tsp baking powder
1/2 tsp baking soda
1/4 tsp salt
1 + 1/3 cup low fat sharp cheddar cheese, shredded
1/3 cup butter
2/3 cup sugar
2 eggs
2 Granny Smith apples, 1 diced (I like a larger dice so you can tell there are apple pieces in the muffin!), 1 grated


Mix the flour, baking powder, baking soda and salt together. Then mix in 1 cup of the cheddar cheese.

In a separated bowl, cream butter and sugar. Add eggs 1 at a time. Mix in the diced and grated apples.

Add the dry ingredients to the wet ingredients in two batches, stirring well after each batch.

Fill the muffin tins about halfway with dough. Using the 1/3 cup cheddar cheese, top each muffin with a bit of cheddar.

Bake for approximately 20-25 minutes, until the tops are golden brown.

Enjoy!


Find more from Katie Stories here:
twitter | facebook | instagram | pinterest | google+ | bloglovin\

*The PointsPlus® values for these products and/or recipes were calculated by me and are not an endorsement or approval of the product, recipe or its manufacturer or developer by Weight Watchers International, Inc., the owner of the PointsPlus® registered trademark.
Related Posts Plugin for WordPress, Blogger...